Braising is a go-to technique for cooking meats (pot roast, anyone?), but it comes to mind a little less often when we think about preparing produce. The idea is exactly the same as with short ribs or a chuck roast: sear off the veggies, and gently cook them, barely submerged in liquid and a little fat, in a covered pot. The veggies and liquid flavor each other as they stew, and the broth creates steam that tenderizes the greens.
We’re going to start off Braising 101 with a recipe for braised celery, but the technique can apply to a broad range of main ingredients and nearly infinite flavor combinations. So we’ve also mapped out a template for a choose-your-own-braise adventure. Play around, and share your winning combos in the comments.
Simple Braised Celery
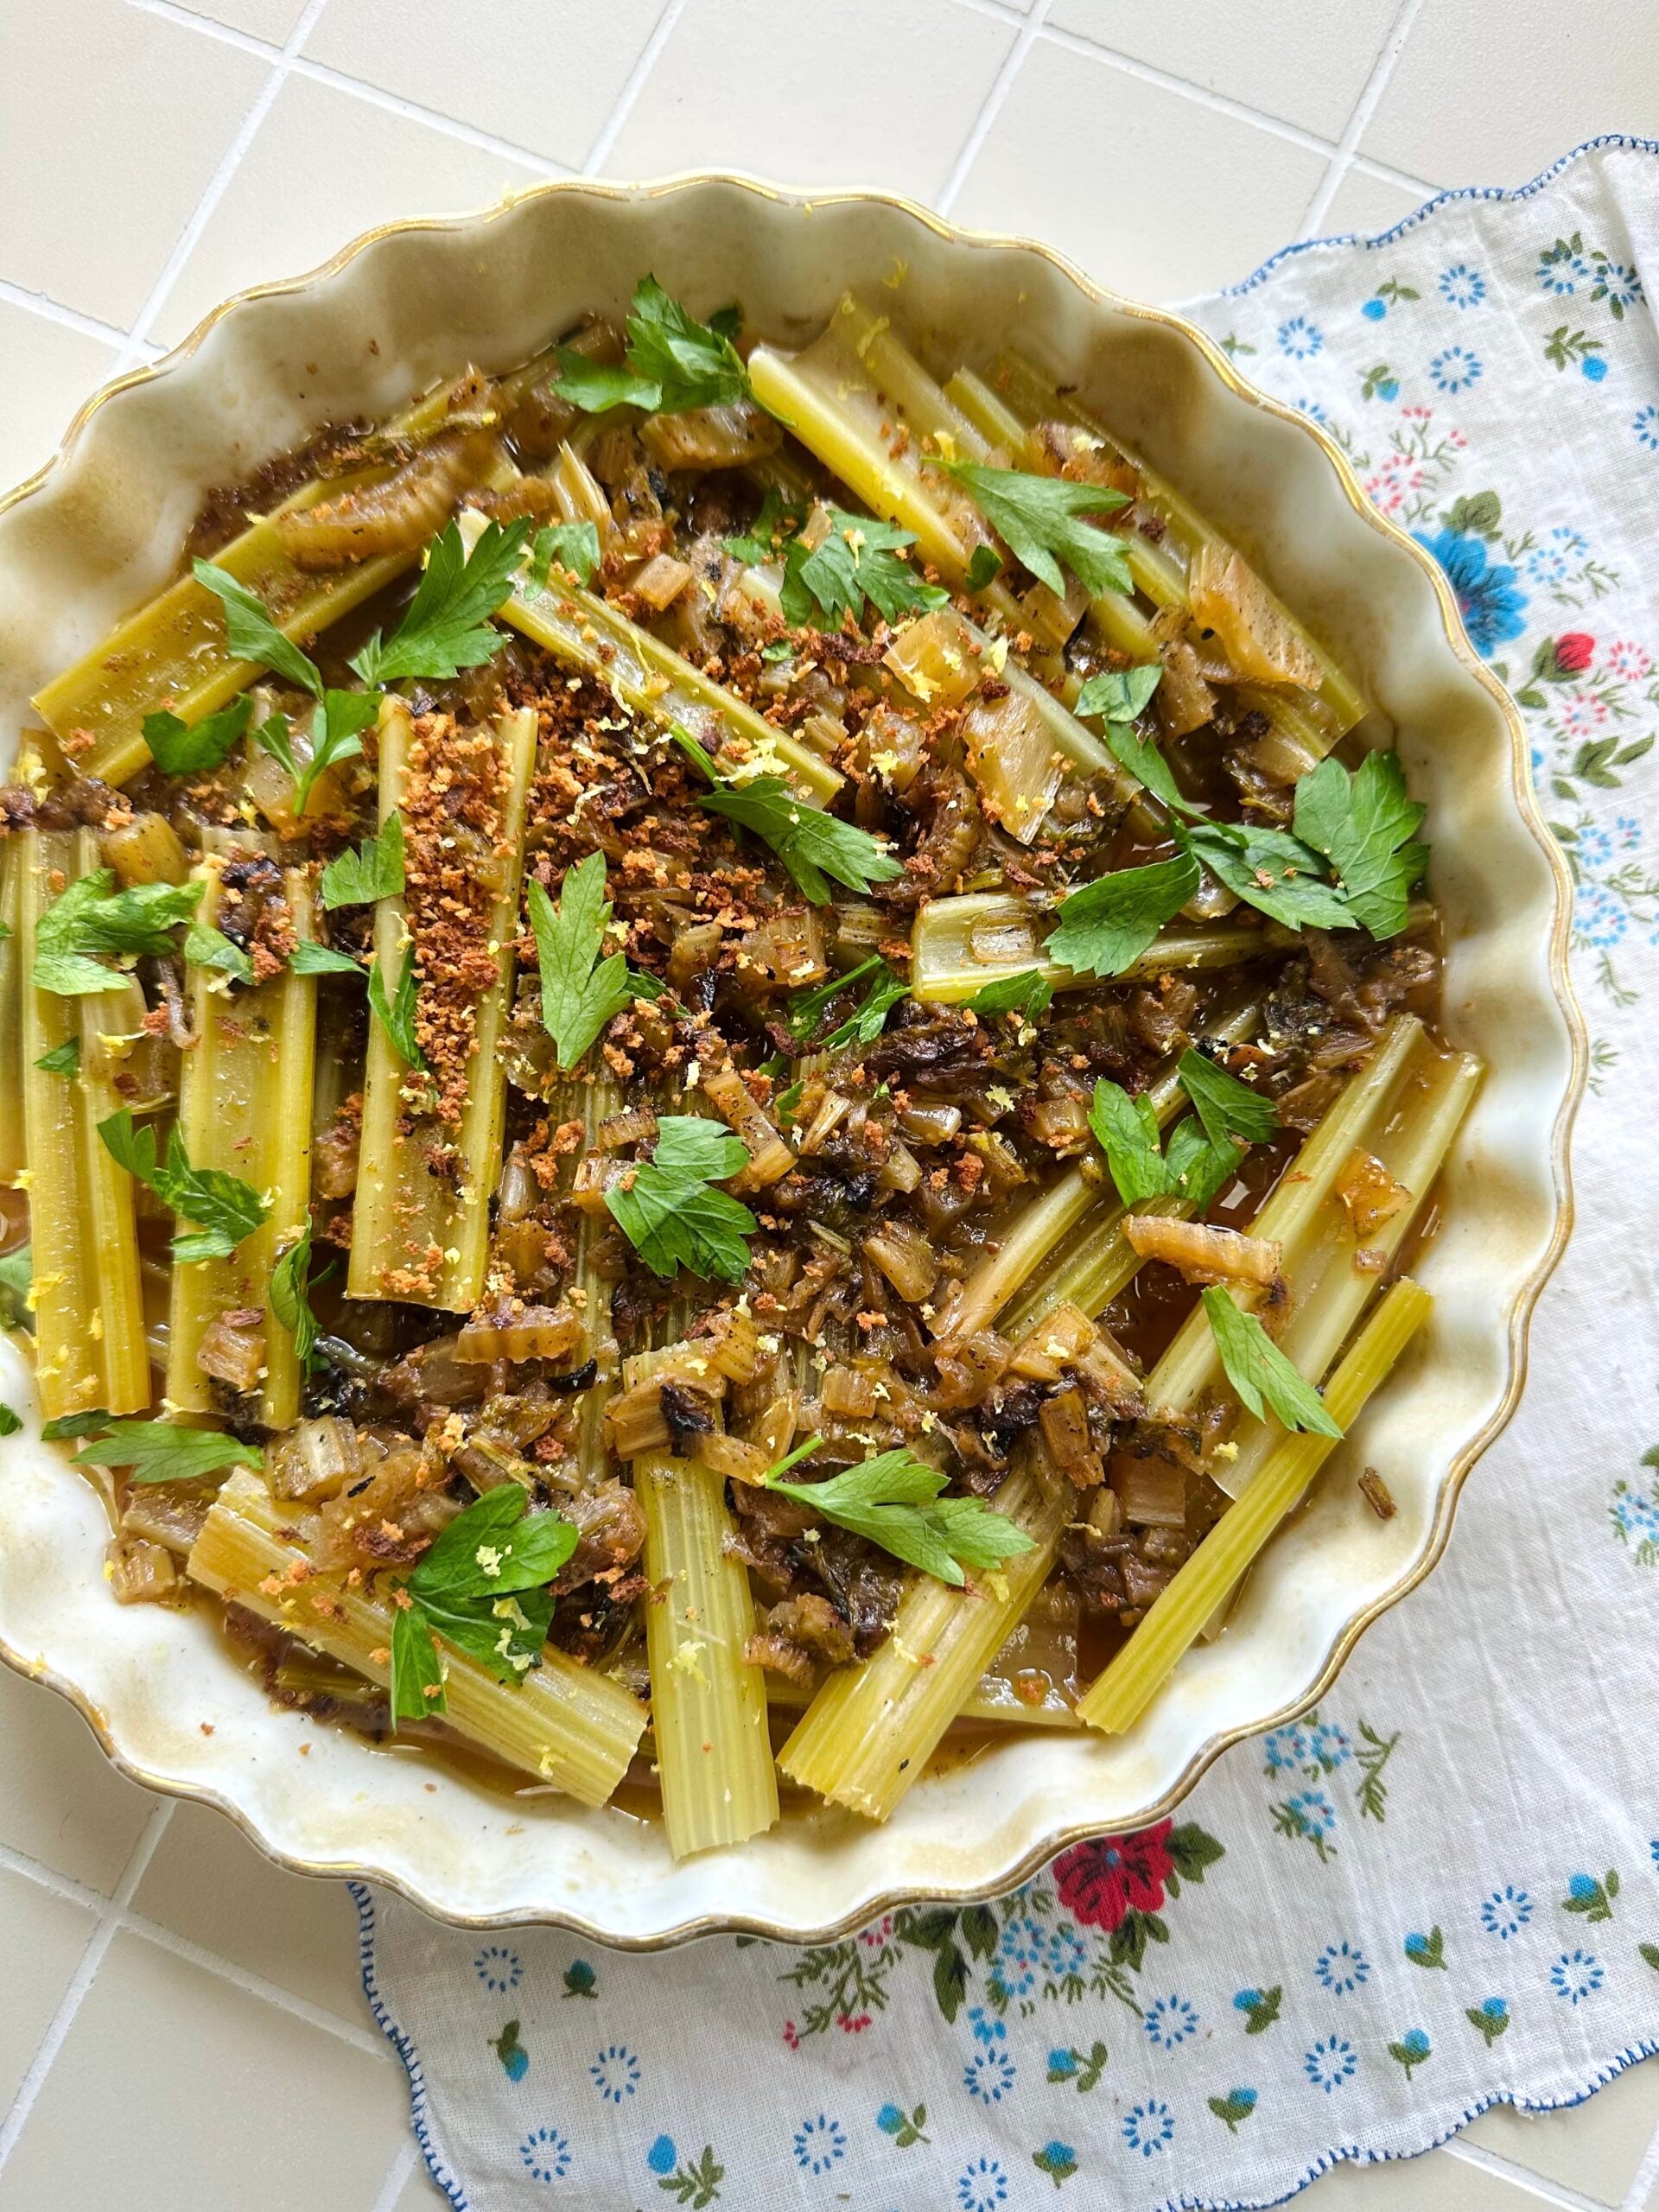
We’re willing to bet you’ve got a bunch of celery in the back of your crisper drawer right now begging to be used. Give those stalks a bath in an herby anchovy-spiked broth and kick back and let your oven do the work. Serve these simmered greens as a side dish, on top of polenta or grains, or on some crusty bread. Just don’t forget to spoon on some of that magic broth.
Ingredients:
- 1 head celery (about 1 ¾ pounds)
- 2 tablespoons olive oil, plus more for the pan
- 1 large shallot, finely chopped
- ¼ teaspoon kosher salt (½ teaspoon if you skip the anchovies)
- Freshly cracked black pepper
- 4 anchovies, finely chopped (optional)
- ¼ cup white wine
- 1 cup low-sodium vegetable stock
- 4-5 fresh thyme sprigs
- ½ cup panko breadcrumbs
- Zest of 1 lemon
- Chopped parsley, for garnish
Procedure:
- Preheat the oven to 325 degrees F.
- Prep the celery. Tear the celery stalks from the head until you reach the shorter, pale stalks, or the heart. Set it aside. Trim off the stalks’ leafy tops and set those aside, too. Use a peeler to shave off the fibrous strings from the stalks, and cut the stalks into pieces about 3 inches long. Oil a baking dish and arrange the stalks in a single layer (slight overlap is OK). Finely chop the reserved celery heart and leaves.
- Make the braising liquid. In a medium skillet over medium-high heat, add 1 tablespoon of olive oil. Add the shallot and chopped celery heart and leaves. Season with ¼ teaspoon each salt and pepper (or ½ teaspoon salt if omitting the anchovies). Cook, stirring occasionally, until the vegetables are soft and starting to brown, about 10 minutes. Add the chopped anchovies and cook for about 1 minute longer. Pour in the wine and simmer until mostly evaporated, about 3 minutes. Add the vegetable stock and simmer until reduced by half, 5 to 6 minutes.
- Braise. Pour the stock mixture over the celery in the baking dish, and add the thyme sprigs. Cover with foil (or a lid if you have an ovenproof one) and transfer to the oven for 1 hour and 15 minutes, or until the stalks are very tender when prodded with a knife. If you want a bit more bite to your celery, start checking at 45.
- Prep the final flourish. Meanwhile, in a medium skillet over medium-low, heat the remaining tablespoon of olive oil. Add the panko and stir to coat evenly. Cook, stirring often, until the panko is golden brown, about 4 minutes; season with salt.
- Assemble. Garnish celery with lemon zest, chopped parsley, and toasted panko.
Serving Suggestions:
- Jazz up a bowl of polenta or rice.
- Pile it on some toast (subbing it here for the raw celery).
- Jammy eggs and marinated anchovies are always a good idea.
- Bulk it up with some chickpeas.
- Add marinated lentils and some crusty bread to make it a meal.
The basics of braising
Braising is a forgiving technique that can be done on the stove (our preferred method), in the oven, or a combo of both. Think of it like a very shallow stew: It takes a bit more time, but the reward is luxurious veggies with more complexity than they’d get from a simple sauté. Here’s how to apply it to anything:
Step 1: Prep your veggies
Braising works for both hearty and tender veggie varieties—from celery to big chunks of winter squash—but isn’t ideal for super watery things like tomatoes and zucchinis, because they’ll just turn to sauce. In terms of chopping, the bigger the pieces the better. Larger, chunky cuts take longer to cook than thinner, flatter ones, which means the veggies have no choice but to spend some extra time soaking up that braising liquid. However you slice and dice ’em, just make sure to keep your veggies uniform in size so they cook evenly.
- Cut into chunks: Squash, celery, cabbage, fennel, carrots, parsnips, onions, broccoli, cauliflower, beets.
- Halve: Mushrooms, Brussels sprouts, shallots, endive.
- Leave whole: Asparagus, green beans, peas.
Step 2: Sear (or not to sear)
Meat is typically seared before braising so it can develop a brown, caramelized crust (the result of what’s called a Maillard reaction) that seals in juices. This step isn’t totally necessary with veggies, but it will enhance the flavor of your final braise. Certain veggies can take that char and heat on the outside without overcooking on the inside, so you can really get a good sear on them; others are more delicate.
- Sear: Hearty veggies like winter squash, carrots, parsnips, cabbage, mushrooms, and onions in a couple tablespoons of oil over high heat. (You can skip the sear if you’re in a rush, but why oh why?)
- Don’t sear: Thin veggies like asparagus, peas, green beans, leafy greens, and celery.
Step 3: Build your flavor base
If you seared your veggies, remove them from the pan and set aside. If not, it’s time to start cooking. Over medium-high heat, add oil to the pan along with some aromatic veggies, like finely chopped shallots, ginger, garlic, carrots, and celery, and sauté until tender.
Step 4: Deglaze
Add about ¼ cup of liquid to loosen and scrape up any left-behind flavor bits on the bottom of the pan. You can use vinegar, wine, or vermouth—even a little water will get the job done.
Step 5: Add your braising liquid
Place your seared (or unseared) veggies in a baking pan in a single layer, pour in enough liquid to cover them halfway, and reduce the heat to medium/medium-low. There are three components to building flavor, but you can also keep it easy with a simple base.
- Base liquid: You can use water, but veggie stock will impart deeper flavor. For more complexity, you can combine the broth with wine, beer, cider, or even a can of chopped tomatoes.
- Meaty add-ons: If you want some extra umami, add 1 to 2 tablespoons of soy sauce or vinegar.
- Extra seasoning: Now’s also a great time to add herbs, dried chiles, seaweed, or any other extra flavor weapons you want to infuse into the cooking broth.
Step 6: Let the braising begin
Set your oven to 325 degrees, cover the pan, and let the veggies cook until tender. Depending on the vegetable and size of the cut, this could take anywhere from 15 to 20 minutes for greens and tender veggies like asparagus or 2 hours for cabbage or squash. The ultimate level of doneness is a matter of personal preference. If you like a bit more bite to your veggies, start checking on the earlier side. The longer the braise, the more meltingly tender things will get.
Step 7: Add the final flourishes
Finish off the dish with a squeeze of citrus or a scattering of fresh herbs to add brightness to all those rich flavors that developed in the oven. We’re also partial to a sprinkling of something crunchy for added texture, like toasted breadcrumbs or pine nuts.